
Discover the latest and most stylish churidar neck design trends that are dominating fashion this year. From elegant embroidery to modern cuts, these neck designs can elevate any churidar suit.
Stitching Guide for Churidar Neck Designs
Creating the perfect churidar neck design requires attention to detail and precision. Start by choosing the right neckline shape—round, V-neck, boat neck, or keyhole. Measure accurately around the neck and shoulders to ensure a comfortable fit. Use quality fabric that holds the design well and mark the neckline carefully on your material before cutting. For embroidered or embellished neck designs, plan the stitching sequence to avoid fabric puckering. Finishing the edges with piping or bias tape gives a professional look and durability to the neckline.
Notched Round Neck Design (also known as Split Round Neck)
✨ About This Neck Design:
This is a round neckline with a center notch or slit. It’s a very popular and simple design in daily wear churidar or kurti sets. The round shape softens the neckline, while the slit adds style and comfort.
✔️ Looks good on printed fabrics
✔️ Comfortable for everyday wear
✔️ Traditional yet elegant
✂️ How to Stitch This Neck Design (Step-by-Step in Simple Language)
🧶 Materials Needed:
- Dress fabric
- Matching facing fabric or interfacing
- Chalk, scissors, measuring tape, sewing machine
📏 Measurements Needed:
- Neck depth (front): 6–7 inches
- Neck width: 6 inches
- Slit length (notch): 2–3 inches
🪡 Stitching Steps:
- Marking the Neckline
- Fold the front fabric in half vertically.
- Mark the round neckline: 6″ wide and 7″ deep (adjust as per design).
- Mark a 2–3 inch straight line down from the center for the notch/slit.
- Cutting the Neckline
- Cut the round neckline first.
- Then, carefully cut along the center slit for the notch.
- Preparing the Facing/Interfacing
- Take matching fabric, fold it, and trace the same neck shape + 1 inch extra all around.
- Cut the same slit in the facing fabric too.
- Join Facing to Neckline
- Place facing and dress fabric right sides together.
- Stitch along the neckline and the slit shape.
- Turn and Press
- Cut small notches on the curve.
- Turn the facing to the inside.
- Press well and topstitch if needed.
- Add Patti/Placket (Optional)
- If you want a contrast placket look like the image, stitch a decorative patti on both sides of the notch.
V Neck Design with Overlapping Panel Style
This classic V-neck is given a contemporary twist with an overlapping panel illusion. The clean lines of the stripes meet at the center, forming a crisp V. It’s a smart, slimming design ideal for office wear or minimalistic looks. Pair it with statement earrings to elevate the outfit!
✂️ How to Stitch This Neck Design – Step-by-Step:
Materials Needed:
- Lining fabric (optional)
- Tailoring chalk, measuring tape
- Interfacing (if needed)
- Sewing machine
Steps:
- Marking:
- Fold the fabric vertically and mark a centered V shape with a slight dip (about 6-7 inches deep).
- Make sure both sides are symmetrical.
- Cutting:
- Carefully cut along the V-shape and open the fabric.
- Facing or Lining:
- Cut the same V-shape on interfacing or lining fabric.
- Stitch right sides together and clip the point of the V to avoid puckering.
- Turn and Top-Stitch:
- Turn the facing inside, press well.
- Top-stitch near the edge for a crisp finish.
- Overlapping Illusion (optional):
- If using stripes or a pattern, make sure they meet cleanly at the center to give an overlapping panel look.
Angled V-Neck with Mirror Panel Border Design
This design features a clean and graceful angled V-neckline that extends smoothly into the center of the bust. It is subtly embellished with a printed or mirror-look border that adds just the right amount of sophistication. Ideal for festive gatherings or semi-formal events, this neck style offers both ease of wear and elegance, making it a must-have in your churidar collection.
✂️ How to Stitch This Neck Design – Step-by-Step:
Materials Needed:
- Fabric for the kurti
- Fusible interfacing
- Matching printed border or lace (mirror or ethnic style)
- Iron, sewing machine, scissors, chalk
Steps:
- Marking the Neckline:
- From the folded center, mark a slanted V-neck that drops 6 to 7 inches from the base of the neck.
- The V-angle here is slightly sharp, not too deep but enough to highlight the collarbone.
- Cutting and Backing:
- Use fusible interfacing in the same shape to reinforce the neckline.
- Cut both the fabric and interfacing together to maintain symmetry.
- Creating Clean Finish:
- Stitch the main fabric and interfacing (or lining) together at the neckline.
- Snip the V-point slightly, turn the fabric inside, and press flat.
- Adding Border or Mirror Strip:
- Use a printed strip, lace, or mirror border and sew it neatly along the neckline edge.
- Fold and top-stitch if needed to create a polished look.
- Back Neckline (optional):
- Match with a slightly curved or square back neck to balance the front design.
Scoop Notch Neck with Button Placket Design
This neckline features a soft scoop shape with a clean, center front notch and a button-down placket that enhances the kurti’s elegant yet everyday appeal. The maroon embroidered trim along the neckline and placket adds definition. This style is ideal for office wear or casual outings, offering a fusion of comfort and sophistication.
✂️ How to Stitch This Neck Design – Step-by-Step:
Materials Needed:
- Kurti fabric
- Matching or contrast embroidered border
- Fusible interfacing
- 3–4 small decorative buttons
- Chalk, scissors, sewing machine
Steps:
- Marking the Neckline:
- Draw a moderate scoop (about 3.5 to 4 inches deep) at the front center.
- From the center, add a 3–4 inch vertical slit to create the notch/placket base.
- Cutting and Backing:
- Reinforce with interfacing in the neckline and placket area.
- Cut a facing for the scoop and slit together for a neat turn-in.
- Placket Construction:
- Open the slit and fold edges in neatly.
- Attach a placket strip on both sides of the slit (either using contrast fabric or decorative lace), creating space for buttons.
- Adding Border and Buttons:
- Stitch embroidered lace/border along the neckline and the placket edges.
- Add 3 to 4 small buttons vertically along the slit for detailing.
- Back Neckline (optional):
- Use a rounded or slightly high back neck to keep the look traditional and balanced.
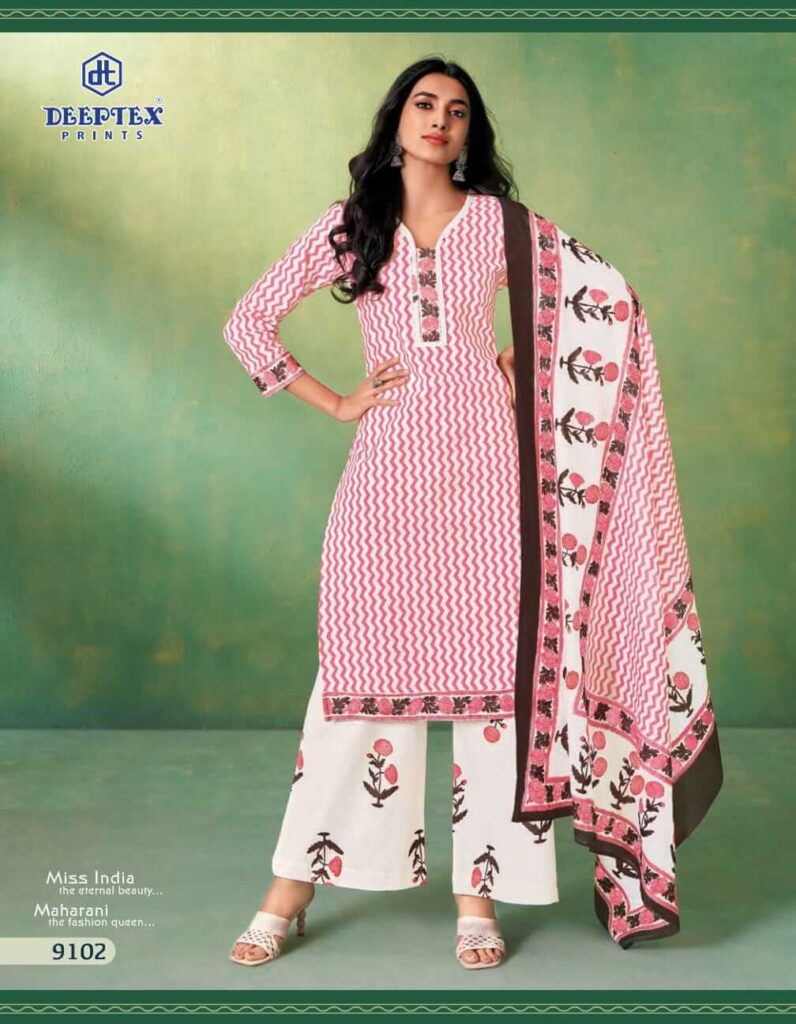
Sweetheart Neck with Straight Placket Panel Neck Design
This kurti features a gentle sweetheart neckline that adds a soft, feminine curve to the front. The neckline is complemented with a vertical panel-style placket embellished with floral patches and contrast piping. It’s a perfect choice for women who love a mix of grace and structure in their ethnic wear.
✂️ How to Stitch This Neck Design – Step-by-Step:
Materials Needed:
- Kurti fabric
- Matching or contrast patch fabric (for placket design)
- Fusible interfacing
- Floral motifs or embroidery patches
- Chalk, scissors, sewing machine
Steps:
- Neckline Marking:
- Draw a shallow sweetheart shape, ensuring it’s not too deep (around 3.5 inches from shoulder line to center dip).
- Placket Panel Marking:
- Extend a 2.5 to 3 inch wide vertical rectangle from the center of the neckline about 5–6 inches down for the patch placket.
- Reinforcement:
- Use interfacing behind the neckline and placket area to prevent fabric shifting and to give shape.
- Cutting and Stitching:
- Cut and finish the sweetheart neckline first.
- Then prepare a straight rectangular patch (in contrast or printed fabric) and stitch it over the placket space.
- Add contrast piping to the neckline and placket borders for enhanced detailing.
- Decorative Elements:
- Stitch embroidered or fabric floral patches over the placket.
- Optionally, attach a small hook or loop at the top center of the neckline.
V Neck with Double Border Piping Neck Design
This kurti showcases a clean, classic V neckline enhanced with a twin-layer piping border in contrast colors. The double border creates a sharp, tailored appearance while adding elegance to the floral printed fabric. Ideal for casual and office wear, this design flatters the neckline while remaining modest and sophisticated.
✂️ How to Stitch This Neck Design – Step-by-Step:
Materials Needed:
- Main kurti fabric
- Two contrast piping fabrics
- Fusible interfacing
- Chalk, measuring tape, scissors, sewing machine
Steps:
- Neckline Marking:
- Mark a V shape starting 6 to 7 inches deep at the center front.
- Ensure symmetry on both sides for a clean V.
- Reinforcement:
- Apply fusible interfacing around the neckline area on the wrong side.
- Cutting and Finishing:
- Carefully cut the V neckline.
- Stitch a thin contrast piping first (around 0.25 inch width) around the neckline.
- Second Piping Layer:
- Add a slightly wider second piping (around 0.5 inch) just outside the first, maintaining an even gap.
- This double border gives the neckline a neat, layered effect.
- Final Stitching:
- Secure both pipings with topstitching and iron well for a crisp finish.
Classic Shirt Collar Neck Design
This elegant kurti features a shirt-style collar neckline that adds a tailored and semi-formal touch to the outfit. The structured collar blends effortlessly with the bold floral print, making it ideal for both office and festive wear. It’s a timeless design that gives the kurti a smart, confident look.

✂️ How to Stitch This Neck Design – Step-by-Step:
Materials Needed:
- Main fabric
- Interfacing
- Matching thread
- Chalk, scissors, sewing machine
Steps:
- Marking the Neckline:
- Mark a basic U or V neck slit (around 6 to 7 inches deep) on the front panel.
- Keep the shoulder width appropriate for attaching the collar.
- Cut and Prepare the Collar:
- Cut two collar pieces: one for the top layer and one for the inner layer.
- Apply interfacing on one layer to give it shape and stiffness.
- Sew the two pieces together, turn inside out, and press neatly.
- Attach the Collar:
- Sew the collar band first around the neckline.
- Then attach the main collar piece above it.
- Make sure the collar stands or folds cleanly depending on the desired look.
- Topstitching:
- Topstitch around the collar and neckline to secure and refine the finish.
V-Neck with Center Panel Detailing Neck Design
This stylish kurti features a deep V-neck design complemented by a center panel adorned with vertical piping and embroidery. The neckline adds a slimming effect while the central detailing draws the eye, making the outfit both traditional and trendy. A great choice for daily wear or casual outings with a touch of elegance.
✂️ How to Stitch This Neck Design – Step-by-Step:
Materials Needed:
- Main fabric
- Matching or contrast piping/embroidery strips
- Interfacing
- Measuring tools, chalk, scissors, sewing machine
Steps:
- Marking the V-Neck:
- Mark a clean V-shape on the front panel, usually 6–7 inches deep depending on preference.
- Keep the base of the V moderately sharp but not too deep for comfort.
- Prepare the Neckline Facing:
- Cut a facing or use bias tape to reinforce the V-neck.
- Apply interfacing to maintain shape.
- Sew and Finish the Neckline:
- Stitch the facing to the neckline, carefully pivoting at the V-point.
- Clip the center V to allow clean turning.
- Turn and topstitch for a neat edge.
- Add Vertical Piping/Panel Work:
- Stitch narrow fabric strips (or use ready-made piping) vertically from the neckline to the bust area.
- Secure each strip symmetrically for a centered and defined panel effect.
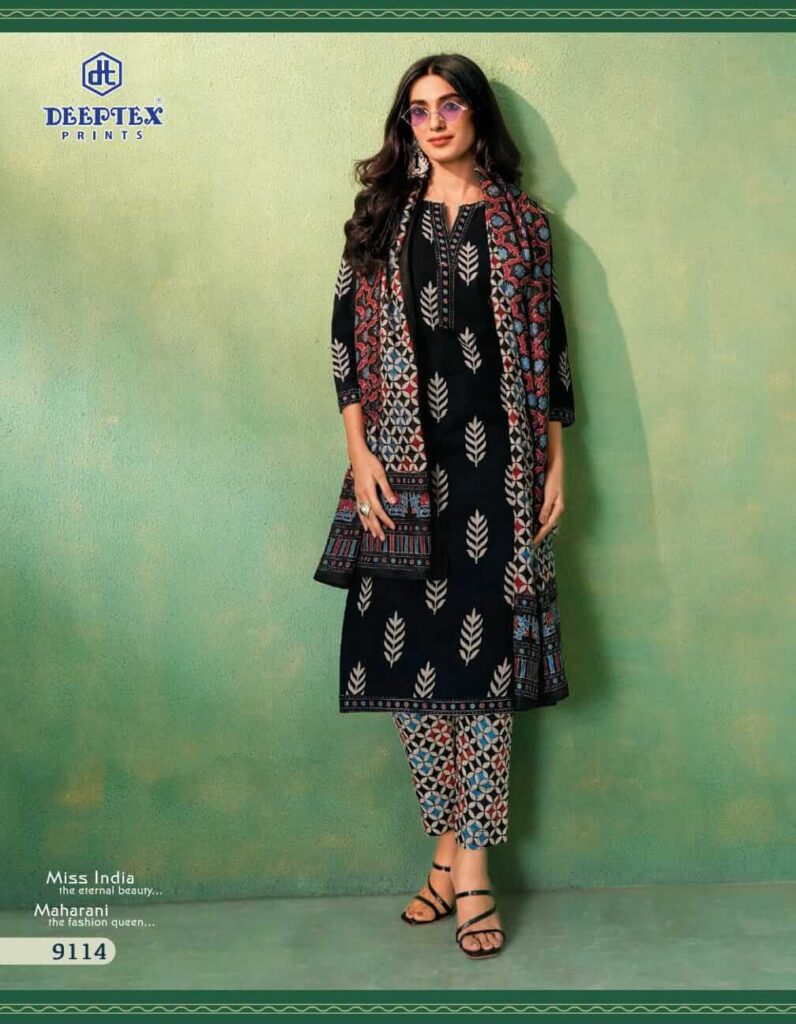
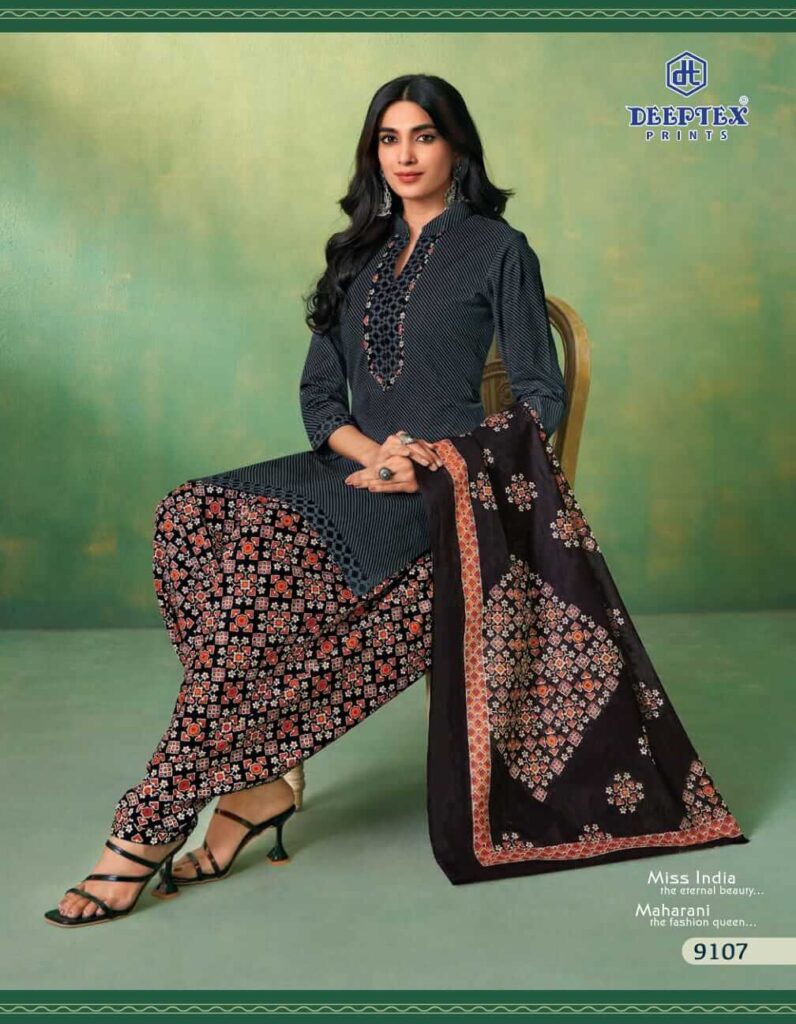
Elegant U-Shaped Placket with Embroidered Panel Neck Design
This elegant churidar outfit features a sophisticated U-shaped placket neck design with beautiful embroidery work. The design showcases a classic vertical placket that opens at the center front with a U-shaped neckline, adorned with intricate embroidery and subtle beadwork that creates a striking contrast against the navy blue pinstriped fabric.
Design Features:
- U-shaped neckline with a vertical opening
- Embroidered panel along the placket in black with colorful accent embroidery
- Matching embroidered detailing on the cuffs
- Perfect balance of simplicity and ornate detailing
- Elegant silhouette that flatters various body types
How to Stitch This Neck Design:
- Cut the neckline: Draw a U-shaped curve on your bodice front piece, measuring about 3 inches deep from the center and 2.5 inches wide on each side.
- Prepare the placket: Cut a rectangular piece of fabric for the placket about 9 inches long and 2.5 inches wide. Fold it lengthwise with right sides together and stitch along one short edge.
- Create the embroidery panel: On a separate piece of black fabric, create your embroidery design using colorful threads and optional beadwork. Focus on creating a vertical pattern that complements the U-shape.
- Attach the embroidered panel: Once your embroidery is complete, attach it to the right side of your placket piece.
- Join the placket: With right sides facing, pin the placket to the front neckline opening. Stitch carefully, ensuring the U-shape remains even.
- Finishing: Turn the placket right side out, press well, and topstitch around the edges for a clean finish. Add small hooks or buttons for closure if desired.
This neck design works beautifully for formal occasions while remaining comfortable for everyday wear. The contrast between the structured pinstriped fabric and the ornate embroidery creates a perfect balance that elevates the entire churidar ensemble.
Mandarin Collar with Straight Placket Neck Design
This charming churidar ensemble features a contemporary Mandarin collar with straight placket neck design in a lovely lavender shade adorned with white polka dots. The neck design combines traditional elements with modern aesthetics, creating a fresh and youthful look perfect for casual and semi-formal occasions.
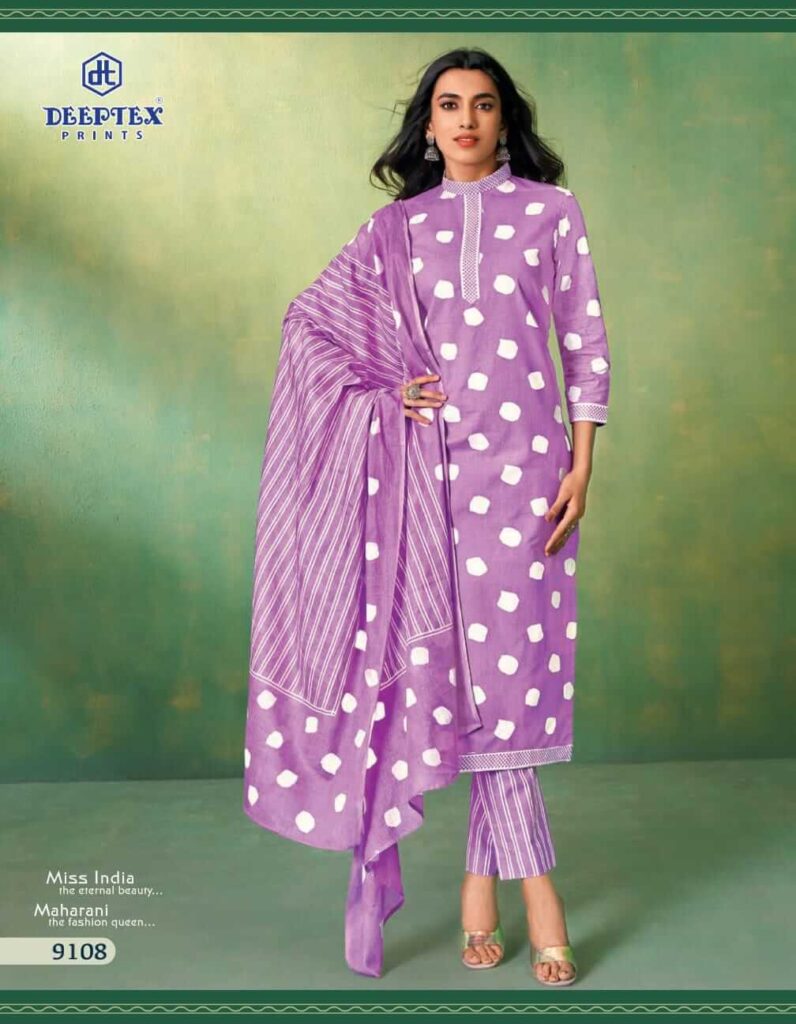
Design Features:
- Stand-up Mandarin collar with delicate white border trim
- Straight vertical placket extending from collar to mid-chest
- Neat white piping detail along the placket and collar edges
- Three-quarter length sleeves with matching border detail at cuffs
- Clean, minimalist design that enhances the playful polka dot pattern
How to Stitch This Neck Design:
- Cut the collar: Measure your neck circumference and add 1 inch for ease. Cut two collar pieces 1.5 inches wide and the length of your measurement.
- Prepare the placket: Cut a rectangular strip of fabric 10 inches long and 2 inches wide. Fold it lengthwise with wrong sides together and press.
- Create the neckline opening: Cut a straight vertical slit at the center front of your bodice, about 8 inches long.
- Attach the placket: Pin the folded placket strip along both sides of the front opening. Stitch carefully, ensuring even seams.
- Add the piping: Cut thin strips of white fabric (or use ready-made piping). Sandwich these between the placket and the main fabric before stitching for a clean finish.
- Construct the Mandarin collar: Interface one collar piece for structure. Place right sides together with the second piece and stitch along the top and short edges. Turn right side out and press.
- Attach the collar: Sandwich the raw neckline edge between the collar pieces and stitch. Add white piping along the edges for the detailed finish.
- Finishing: Add small buttons or hidden snaps along the placket for closure.
This neck design is versatile and flattering, offering a modest yet stylish look. The Mandarin collar elongates the neck while the straight placket creates a balanced vertical line that complements the pattern of the fabric. Perfect for summer wear or layered in cooler seasons!
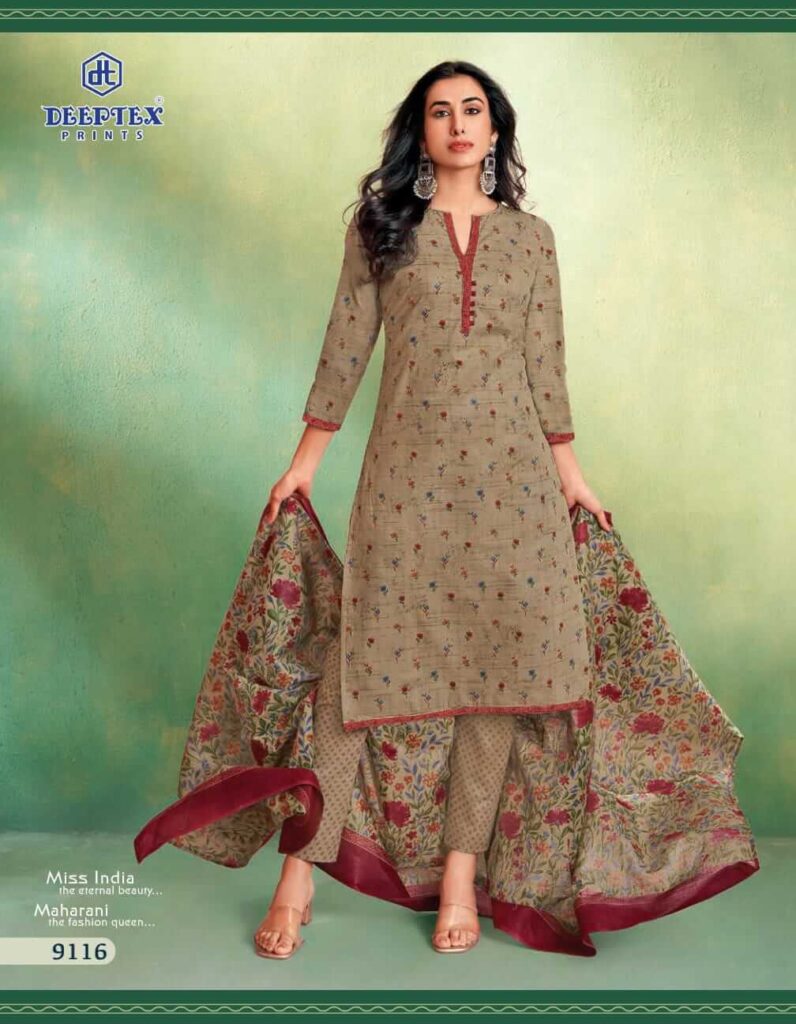
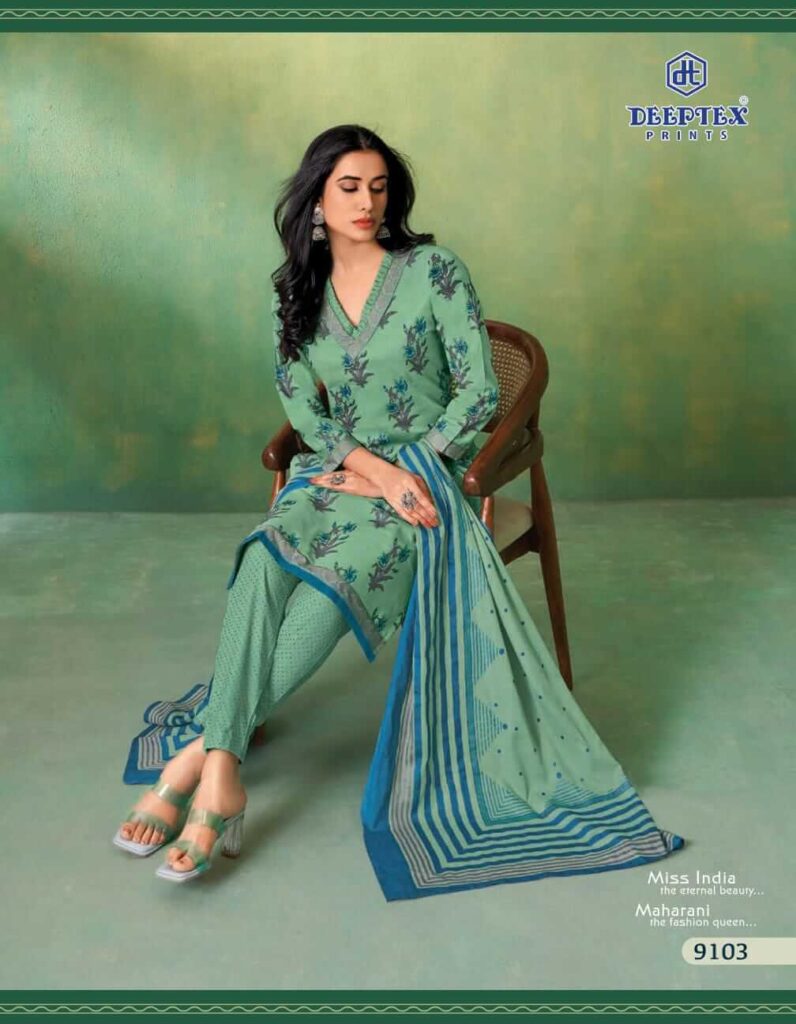
Y-Shaped Placket Neckline Design
This vibrant churidar ensemble features a classic Y-Shaped Placket Neckline Design in a fresh olive green with colorful floral prints. This traditional neckline style offers a simple yet elegant look that perfectly balances the bold pattern of the fabric.

Design Features:
- Y-shaped vertical slit opening at the center front
- Clean, tailored edges without embellishments
- Subtle notch at the top of the placket forming the Y-shape
- Narrow red piping along the neckline that coordinates with the dupatta
- Three-quarter length sleeves with matching piping at the cuffs
How to Stitch This Y-Shaped Placket Neckline:
- Draw the pattern: Mark a straight line down the center front, about 5-6 inches long. At the top, mark a gentle Y-shape that splits about 1 inch from the top.
- Cut the opening: Carefully cut along your marked lines, ensuring the Y-shape is symmetrical.
- Prepare the facing: Cut two identical facing strips that follow the Y-shape, about 1.5 inches wide.
- Create the piping: Make or use store-bought red piping that will outline the neckline edges.
- Attach the piping: Sandwich the piping between the main fabric and facing along both sides of the Y-opening, with the cord portion of the piping positioned to show on the right side.
- Stitch the placket: Carefully stitch close to the piping cord, ensuring the Y-junction is neat and symmetrical.
- Turn and finish: Turn the facing to the inside, press well, and topstitch for a clean finish.
- Add closures: For functionality, add small buttons, hooks, or hidden snaps along the placket if desired.
This clean and classic neckline design allows the beautiful floral print to be the focal point of the outfit. The Y-shaped opening provides comfort and ease of wear while the subtle red piping creates a cohesive connection to the striking red dupatta. This versatile neckline works beautifully for both casual and semi-formal occasions.
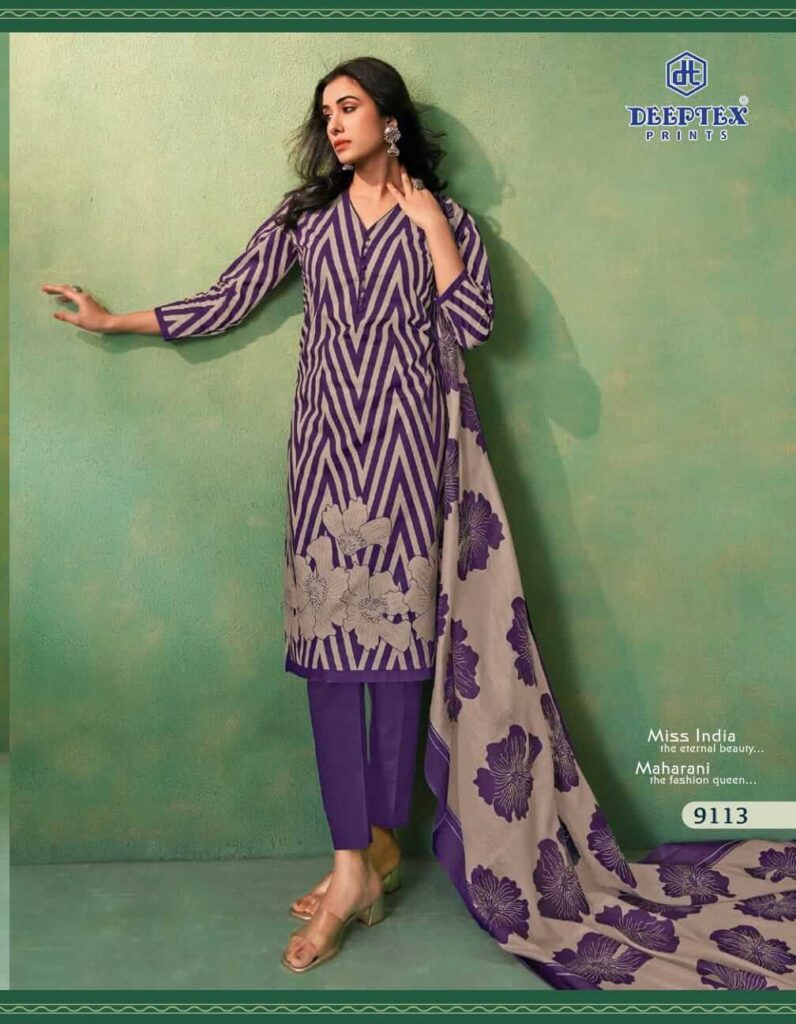
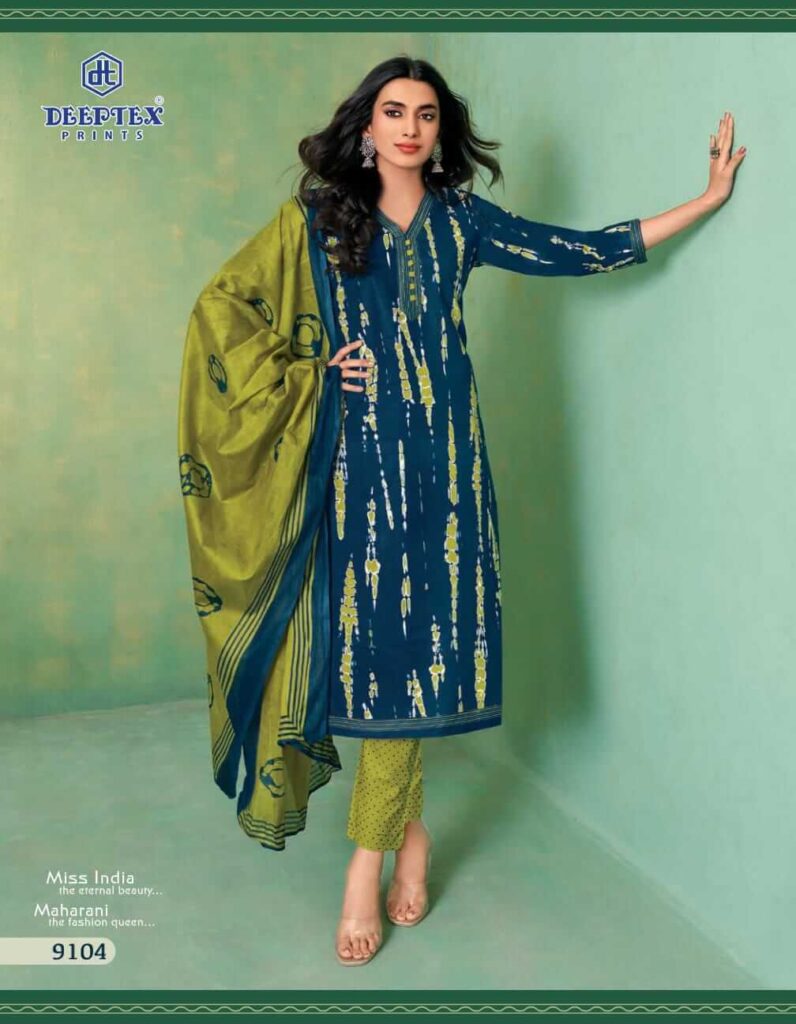
V-Neck with Silver Gota Border Design
This stylish churidar outfit features a sophisticated V-Neck with Silver Gota Border Design in a striking blue striped pattern. The neck design showcases clean lines and metallic accents, creating a contemporary look perfect for both casual outings and semi-formal events.
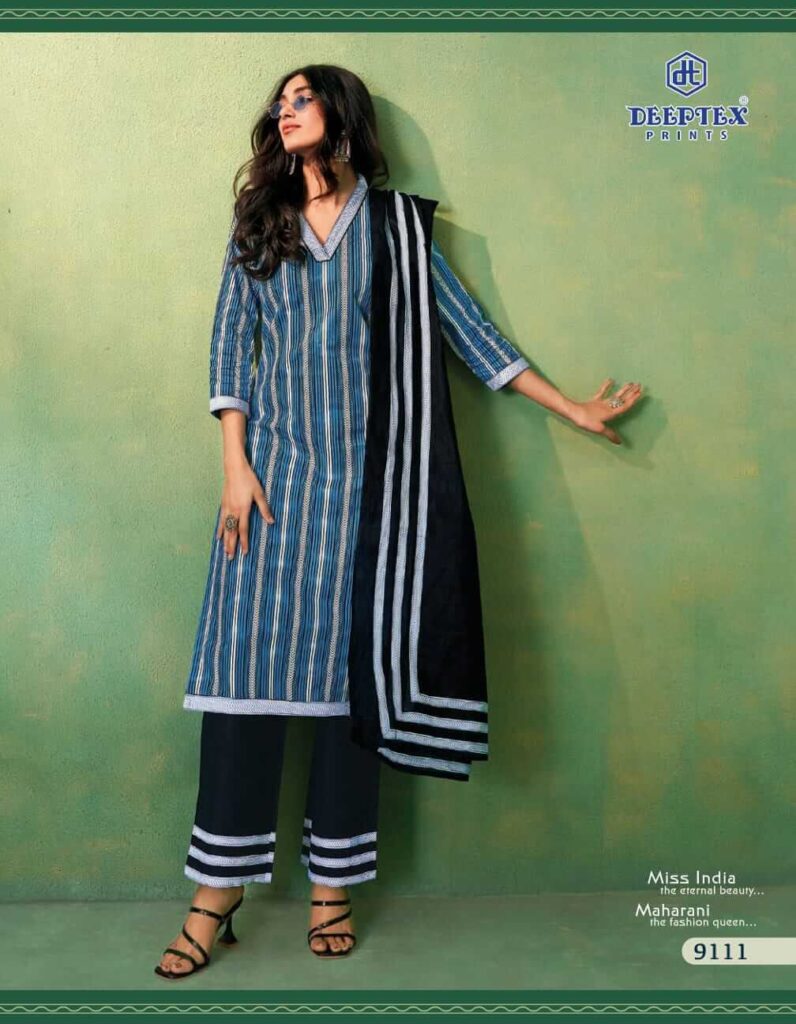
Design Features:
- Deep V-neckline with a straight, clean cut
- Elegant silver gota patti border tracing the V-shape
- Coordinating silver border at sleeve cuffs and kurta hem
- Modern silhouette enhanced by vertical stripes
- Harmonizing elements connecting kurta, bottoms, and dupatta
How to Stitch This Neck Design:
- Draw the pattern: Mark a clean V-shape on your bodice front, extending about 7-8 inches down from the shoulder point. Ensure the V is symmetrical and has a defined angle (approximately 80-90 degrees).
- Cut the neckline: Carefully cut along your marked V-line, ensuring straight, clean edges.
- Prepare the silver gota border: Cut silver gota patti trim to match the length of your V-neckline, plus an additional inch for seam allowance. If using fabric, cut 1-inch wide strips on the bias.
- Attach the facing: Cut a facing piece that follows the V-shape. Interface it for stability.
- Apply the silver trim: Before attaching the facing, sandwich the silver gota trim between the main fabric and facing, with the decorative edge positioned to show on the right side.
- Stitch the neckline: Sew along the V-neckline, keeping close to the inner edge of the gota trim. Be especially careful at the point of the V to maintain a sharp angle.
- Turn and finish: Turn the facing to the inside, press well, and understitch to keep the facing from rolling to the outside. Topstitch if desired for a crisp finish.
- Add coordinating trim: To complete the look, apply matching silver gota to cuffs and hemline using the same technique.
This elegant V-neck design creates a lengthening effect that flatters most body types. The silver gota border adds a touch of sophistication while defining the neckline against the blue striped fabric. The simplicity of the V-neck allows the vertical stripes to draw the eye upward, while the silver accents tie the entire ensemble together with the black pants and dupatta. This versatile neck design works beautifully for day-to-night transitions and can be dressed up or down depending on the occasion.
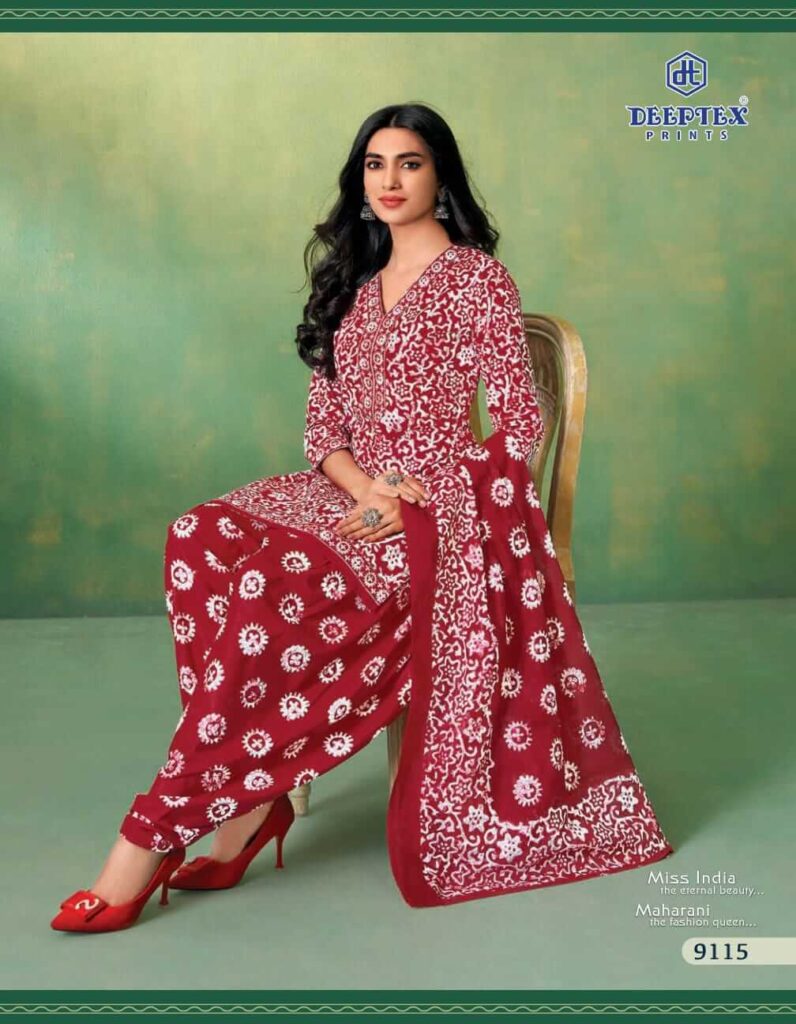
Loop Placket Neckline with Contrast Piping Design
This final churidar outfit features a charming Loop Placket Neckline with Contrast Piping Design in a light beige background adorned with colorful floral motifs. The neck design perfectly balances traditional aesthetics with contemporary style, creating a festive look that’s both eye-catching and refined.
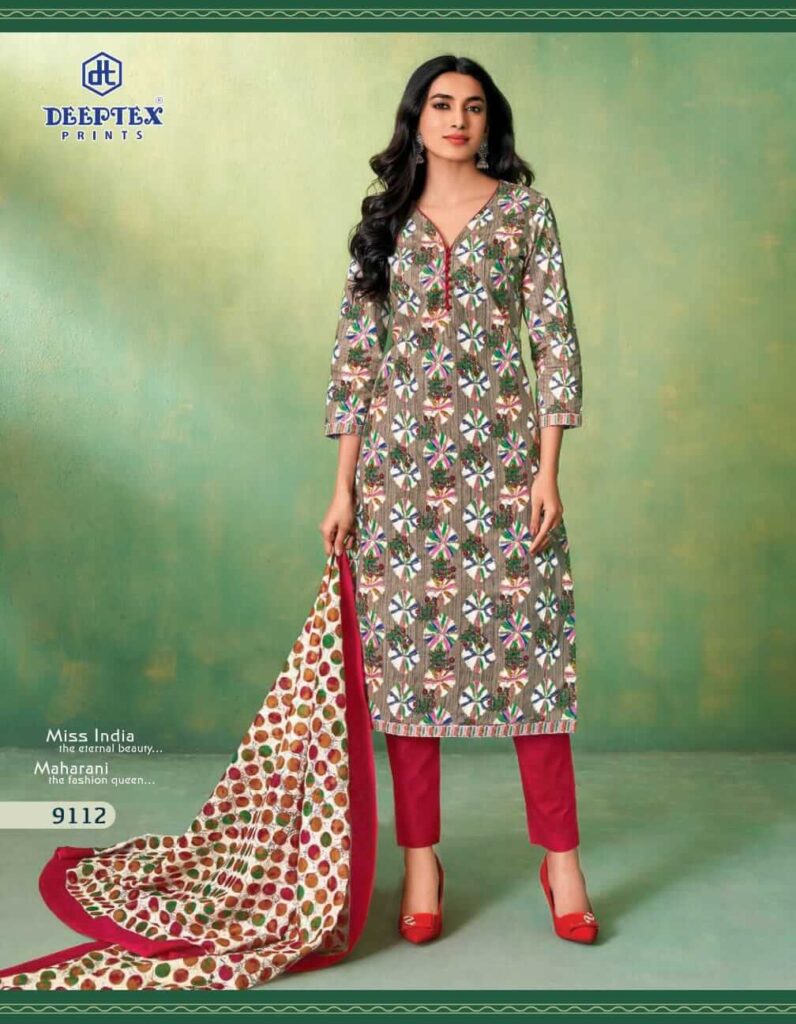
Design Features:
- V-shaped neckline with a small loop placket opening
- Vibrant red piping outlining the neckline and placket edges
- Coordinating red piping at sleeve cuffs and hemline
- Short vertical slit with rounded bottom edge
- Harmonious color coordination with the bright red bottoms and multicolored dupatta
How to Stitch This Neck Design:
- Create the pattern: Draw a gentle V-neckline on your bodice front, about 3 inches deep. Then mark a vertical slit from the bottom of the V extending about 5 inches downward with a slightly rounded end.
- Cut the neckline and placket: Carefully cut along your marked lines, ensuring symmetry on both sides of the V.
- Prepare the piping: Create or use ready-made red piping that matches the vibrant red of the pants. You’ll need enough to outline the entire neckline and placket edges.
- Cut the facing: Cut a facing piece that follows the shape of your neckline and placket. Interface it for stability.
- Attach the piping: Sandwich the red piping between the main fabric and facing along all edges of the neckline and placket, with the cord portion positioned to show on the right side.
- Stitch the neckline: Carefully stitch close to the piping cord, easing around curves and ensuring the V-shape is clean and symmetrical.
- Turn and finish: Turn the facing to the inside, press well, and understitch to keep the facing from rolling to the outside. Add small, decorative stitches by hand along the placket edges if desired.
- Add closures: For functionality, add a small hook and eye at the top of the V-neckline.
This loop placket neckline design is versatile and comfortable while adding a touch of traditional elegance to the outfit. The red piping creates a striking contrast against the beige floral background, drawing attention to the face while connecting the kurta to the red pants and patterned dupatta. The V-neckline is universally flattering and the rounded placket adds a softness that complements the floral pattern. This neck design works beautifully for festive occasions, family gatherings, and semi-formal events.
The red detailing ties together the entire ensemble, creating a cohesive and visually appealing outfit that balances the colorful floral print with solid red elements.
Buy Now: This Beautiful Churidar Cotton Dress Material
Click Below for Full Product Info